This tutorial was created by Rapsody on January 17, 2012.
Any similarity to any other tutorial is purely a coincidence.
You may share this tut but please share the only the link, thank you♥
I am using PSP 12 but any version should work!
We are using the amazing art of Alena Lazareva you must have a license to use this tube. This tube has tons of multi use layers!Alena’s tubes can purchased at UpYourArt
This fab FTU scrap kit by Becky can be found HERE Thank you Becky♥
This gorgeous mask can be found Moon Beams and Spider Webs Thanks so much Staci♥
We will be using:
leafys rotate right 40%
triple frame rotate left 90%
pendant
bow 2 resize 80%
butterfly Yellow 65%
daisy swag rotate right 90%
daisy
purple flower
**After you use each element close it so you have a clean workspace.
Font: I used Inspiration by Rob, a pay font, (size 100) but any pretty script font will work.
Okay, let’s get started!
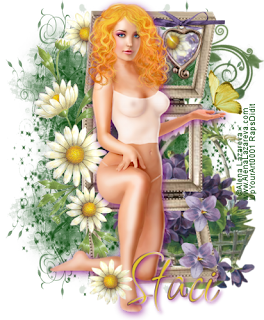
*Open a new image 377 x 478 flood fill green (#004000) Add Staci’s mask as a new mask layer, merge group, leave this for now as we will get it in a minute.
*Open a canvas 600 x600 flood fill white. I like to have the white so I can see my creation better as I work on it. We will delete this later as well as resize.
*Copy your mask image and paste as a new layer.
*Copy Leafy, paste as a new layer, rotate right 40%, move to the outer right edge of the mask.
Copy and paste triple frame as a new layer, rotate left 90%.
*Go back to leafys layer.
*Copy and paste the flower basket as a new layer to the bottom right of the frame so it is underneath the frame.
*Return to the top layer then copy pendant, paste as a new layer, position on the upper right of the frame.
*Copy bow2, paste as a new layer, resize, 80% place above the pendant.
*Copy daisy swag, paste as a new layer rotate right 90%. Place to the left above the frame.
*Place tube as a new layer, resize 80% then mirror and position to the slight left center of the frame.
*Add drop shadow with these settings::
3 2 80 10 on a new layer.
Go to the shadow layer, do a Gaussian blur at 5.
*return to your top layer, copy butterfly Yellow, paste as a new layer, resize 65% and place just above her hand.
*Grab your daisy and purple flowers and arrange as a new layers as shown on tag.
*Make sure everything is where you like it, then delete the bottom white layer, and merge visible, select all, float, crop to selection.
*Apply your copyright, url, and license number.
*Add names, using your Inspiration, using yellow from your tube and a purple gradient, use the drop shadow from above, lowering the shadow opacity to 80%.
*Save as a PNG, you are done, YAY♥
Thank you for visiting and doing this tutorial, I hope you found it enjoyable. I would love to see your results and I welcome any suggestions at CustomerService@UpYourArt.com
Raps ♥
♥ ♥ ♥

