Wednesday, November 30, 2011

HoHo


Ho Ho
This tutorial was created by Rapsody on November 30, 2011.
Any similarity to any other tutorial is purely a coincidence.
You may share this tut but please share the only the link, thank you
♥
I am using PSP 12 but any version should work!

We are using the amazing art of
Steve Baier you must have a license to use this tube. Shawn’s tubes can purchased at UpYourArt
This fab scrap kit by Dark Moons Dreams can be purchased at Heart Felt Perfections  Thank you Dani♥
This gorgeous mask can be found Moon Beams and Spider Webs Thanks so much Staci
♥
We will be using:
Frame 02
PP04
PP01
Flower 01
Ball 01
Ball 02
**After you use each element close it so you have a clean workspace.
Font: I used Jackie O (size 125) but any pretty script font will work.
Okay, let’s get started!
*Find PP01, duplicate, then apply your mask as a new layer, merge group. Leave this for now as we will get it in a few minutes.
*Open a canvas 800 x600 flood fill white. I like to have the white so I can see my creation better as I work on it.  We will delete this later.
*Copy Frame 02 and paste as a new layer.
*Return to your white layer and paste paper PP04 as a new layer.  Move so you have the wordage showing where you like. 
*Move up to your frame layer, with your selection tool go around the frame, invert selection, delete.  Now you have your frame inside your paper.
*Return to your white layer, get your mask image and paste as a new layer, re-size 85% move to the outer/upper right, duplicate layer, mirror and position to your liking.
*Go to your frame layer and add your tube to one of the frames, I re-sized the bonus layer to 65%, add white drop shadow at 40% opacity, 12 blur.
*Repeat the last step for the other side.
*Copy Flower 01, rotate 90 left, move to bottom center of frame.
*Go back to your upper tube layer and add Ball 01 rotate left then duplicate and mirror position to your liking.
*Copy and paste Ball 2 rotate 60%, duplicate then mirror.  Copy and paste as a new layer if you would like it like I did in 3 places.
*Go back to the top layer, and add Bow 02 to the center of the frame add your white drop shadow with the same settings as before
.
*Make sure everything is where you like it, then delete the bottom white layer, and merge visible, select all, float, crop to selection. 
*Re-size 80%.
*Apply your copyright, url, and license number.
*Add names, using your Jackie O, using off white from your tube and a gold gradient, use the drop shadow from above.
*Save as a PNG, you are done, YAY
♥
Thank you for visiting and doing this tutorial, I hope you found it enjoyable. I would love to see your results and I welcome any suggestions at CustomerService@UpYourArt.com
Raps ♥
♥ ♥ ♥


Sunday, November 27, 2011

Christmas Glitz

This tutorial was created by Rapsody on November, 28, 2011.
Any similarity to any other tutorial is purely a coincidence.
You may share this tut but please share the only the link, thank you
♥
I am using PSP 12 but any version should work!

We are using the gorgeous art of
Steve Baier.  You must have a license to use this tube. Steve’s tubes can purchased at
UpYourArt
This beautiful scrap kit “Christmas Glitz” has so many possibilities!  Created by Leigh may be purchased at HeartFelt-Perfections  Thank you so much Leigh!
We will be using:
Silver Frame 22%
Deco 2    19%%
Pine Cone 19%
Snowflakes 30%
Snowflake 10%
Silver Deco 20%
Ribbon 15%
**After you use each element close it so you have a clean workspace.
Mask: From
Zuzzanna Thank you so much!
Font: I used Alex Brush.
Okay, let’s get started!
*Copy your mask and paste as a new layer, duplicate and flood fill with color: #741617.
*Now add mask from image.  I used add mask as a new layer with these settings:
Source Luminance
Check the Invert Box
MERGE GROUP
*Add new layer, flood fill white, send to bottom.  We will delete this layer later but having the white will help you view your tag easily.
*Return to your mask layer and resize to 95%, lower opacity to 90%.
*Add your tube, resize 80%, position like mine, off center to the right.  Add white drop shadow at 50% and 10 blur.
*Add Silver Frame as a new layer, resize 22%, position so the top of the heart doesn’t extend.
*Add Deco 2 as a new layer, resize 19%.  Position on the lower right, be careful not to extend out of your frame.
*Add pine cone.png as a new layer, resize 19%, rotate left, position so it covers her left arm/wing, move down one layer.
*Return to your mask layer, copy snowflakes paste as a new layer, resize 30%
*Go to your bottom white layer, copy snowflake, paste as a new layer, resize 10%, cut, paste into selection positioning where you would like, do this about 5 times as you desire.
*Return to your top layer, add Silver Deco, resize 20% move to left, over the pine.
*Add Ribbon, resize 20% move to the right.
*Delete, bottom white layer, merge visible, and resize 85%
*Apply your copyright, url, and license number.
*Add name using 2 colors from your tag, I used a silver gradient and a #2e3b1e with the same white drop shadow.
*Save as a PNG, you are done, YAY
♥
Thank you for visiting and doing this tutorial, I hope you found it enjoyable. I would love to see your results and I welcome any suggestions at CustomerService@UpYourArt.com
Raps

♥ ♥ ♥

Sunday, November 13, 2011

Winter Wish

This tutorial was created by Rapsody on November 13, 2011.
Any similarity to any other tutorial is purely a coincidence.
You may share this tut but please share the only the link, thank you
♥
I am using PSP 12 but any version should work!

We are using the amazing art of
Susan Justice you must have a license to use this tube. Gretchen’s tubes can purchased at
UpYourArt
This gorgeous now FTU scrap kit “ Somersham Wedding” is found at DigiCats!
We will be using:
DCD_SoWe_Decoration01
DCD_SoWe_Snowy Tree02
DCD_SoWe_Snowflake08
DCD_SoWe_Christmas Candles02
DCD_SoWe_Jewel02.
DCD_SoWe_Pinecone01
Paste DCD_SoWe_Wedding Rings

**After you use each element close it so you have a clean workspace.
Font:  I also used Engravers MT 60
for the couples name, black with white, same drop shadow.
Okay, let’s get started!
*Open a canvas 600 x600 flood fill white. I like to have the white so I can see my creation better as I work on it.  We will delete this later.
Paste your tube as a new layer, resize 85% add black drop shadow on a new layer with these settings:

Photobucket
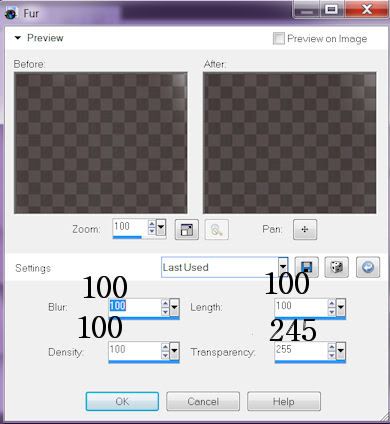
*On your shadow layer, go to effects, texure, Fur with these settings:Photobucket

*Return to your tube layer, add DCD_SoWe_Decoration01 as a new layer, resize 80% duplicate, mirror, resize 80% and arrange to the right see tag for reference.
*Go to your white bottom layer and add DCD_SoWe_Snowy Tree02, resize 75%  and move to the right, copy and paste into new selection on the left side. Next, add DCD_SoWe_Jewel02 as a new selection and place between the 2 trees up top, selection none.
*Go to your tree layer and add DCD_SoWe_Snowflake08 as a new layer, resize 50%, arrange to the left of the trees, copy and paste as a new selection on the right of the trees to your liking see the tag for reference.
*Go to your top layer, and paste DCD_SoWe_Christmas Candles02 as a new layer, resize 75% and move to the bottom left, selection none.
*Paste DCD_SoWe_Pinecone01 as a new layer, resize 30%, mirror, and position at the base of the candles, selection none.
*Paste DCD_SoWe_Wedding Rings as a new layer, resize 25%  move to lower left.
*Apply your “Winter Wish” word art.
Photobucket
*Make sure everything is where you like it, then delete the bottom white layer, and merge visible. 
*Resize 80%.
*Apply your copyright, url, and license number.
*Add names, using your Engraver’s font, using black and white, use the drop shadow from above.
*Save as a PNG, you are done, YAY
♥
Thank you for visiting and doing this tutorial, I hope you found it enjoyable. I would love to see your results and I welcome any suggestions at CustomerService@UpYourArt.com
Raps ♥
♥ ♥ ♥