This tutorial was created by Rapsody on October 16, 2011.
Any similarity to any other tutorial is purely a coincidence.
You may share this tut but please share the only the link, thank you♥
I am using PSP 12 but any version should work!
We are using the whimsical art of Vicki Yeager You must have a license to use this tube. Vicki’s tubes can purchased at UpYourArt
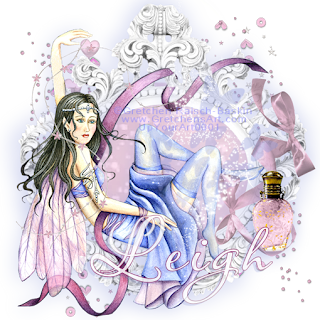
This beautiful scrap kit “Spring Serenade” by Leigh Penrod may be purchased at HeartFelt-Perfections
We will be using:
HP-ssf3
HP-sse19
Hp-ssf14
HP-ssf 12
HP-sse4
**After you use each element close it so you have a clean workspace.
Font: I used Ink In The Meat at 150 with a gradient and a forrest green.
Okay, let’s get started!
*Open a canvas 600 x600 flood fill white. I like to have the white so I can see my creation better as I work on it. We will delete this later.
Copy and paste HP-ssf3 as a new layer, resize 34%, and move up to the upper edge.
*Apply your tube, resize 90% and move slightly to the left. With your Rectangle Selection tool set at 0, delete part of the tube to her hair, see my example:
Select none. Add drop shadow with the following settings:
Offset 7, Horizontal 8, Opacity 75, Blur 40, Color #505125
*With your Magic Wand (tolerance at 4) click in the center of the frame, return to the white layer and add new layer. Copy HP-sse19 and paste into selection into the new layer, select none.
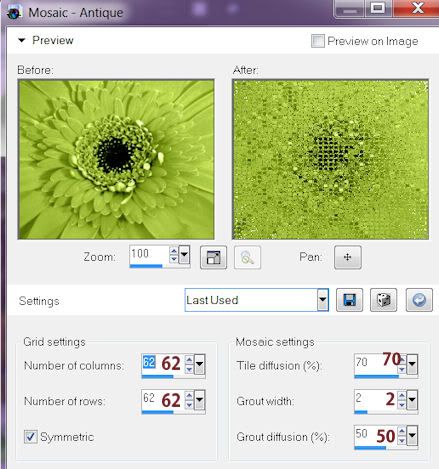
*Stay on the current layer, add effect Mosaic with these settings:
*Add HP-sse19 as a new layer, resize 7% , with your Pick Tool move to the lower left of the frame so 1/3 is showing off the frame.
*Return to your frame layer and paste HP-sse19 as a new layer, resize 7%, move to the lower left of the frame. Add drop shadow.
*Return to your frame layer and paste HP-ssF4 as a new layer, resize 26%, move slightly to the left overlapping the outer edge of the frame, add drop shadow.
* Return to your tube layer, add HP-sse14 as a new layer, resize 21% move to lower part of frame below the opening, add drop shadow.
*Paste HP-ssf 12 as a new layer, resize 22%, rotate 90% left, move to the right of the frame, add drop shadow.
*Return to your top layer, paste HP-sse4 as a new layer, resize 13% move to lower left of frame, duplicate, mirror, move slightly to the left. Add your drop shadow on both layers.
*Make sure everything is where you like it, then delete the bottom white layer, and merge visible.
*Resize 85%, remove any extra space by selecting all, float, crop to selection.
*Apply your copyright, URL, and license number.
*Add name, using your script font, using 2 colors from your tag, add drop shadow.
*Save as a PNG, you are done, YAY♥
Thank you for visiting and doing this tutorial, I hope you found it enjoyable. I would love to see your results and I welcome any suggestions at CustomerService@UpYourArt.com
♥ ♥ ♥
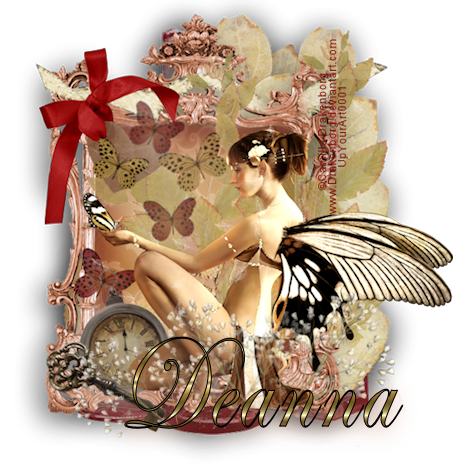
Monarch Demise
This tutorial was created by Rapsody on October 14, 2011.
Any similarity to any other tutorial is purely a coincidence.
You may share this tut but please share the only the link, thank you♥
I am using PSP 12 but any version should work!
We are using the gorgeous art of Camilla Drakenborg You must have a license to use this tube. Camilla’s tubes can purchased at UpYourArt
This beautiful scrap kit “If I die young” has so many possibilities! Created by Butterfly Kisses Scraps may be purchased at HeartFelt-Perfections Thank you Deanna! We will be using:
Paper 7
Bottles
Butterfly 3
Butterfly 4
Frame 05
Key 02
Heart tag 2
Leaves 1, and 2
Scrap 1
Leaf scatter 1
Scrap 1
Spray 1
Watch
**After you use each element close it so you have a clean workspace.
Font: I used Edwardian Script at 100 with a gold gradient and black.
Okay, let’s get started!
*Open a canvas 600 x600 flood fill white. I like to have the white so I can see my creation better as I work on it. We will delete this later.
*Copy Frame 5 and paste as a new layer. Using your Pick tool set on FREE, grab the top and bring it down a bit to make the frame shorter, then move back towards the top.
*With your Magic Wand (tolerance at 0) click in the center of the frame, return to the white layer and add new layer. Get Paper 7 and paste into selection on new layer, select none.
*Return to your frame layer and add a black drop shadow, I used these settings:
Offset Vertical 8, Horizontal -7, Opacity 40, Blur 60
*Return to your bottom white layer, grab the Bottles, paste as a new layer. With your Pick tool set on FREE bring in both sides, make sure you have move extending on the right side. Lower opacity to 80%, add drop shadow.
*Return to your frame layer, add tube, resize 80%, add white drop shadow with the same settings.
*Add Scrap 01 as a new layer resize 50%, position near the top of the Frame. With your selection tool, set a 18 feather, select a small portion near the right of Scrap 01 so it looks like it is woven through the frame, delete.
*Return to your Bottles layer.
*Copy and paste Leaves 02 as a new layer, with your Pick tool rotate towards the right and position to the upper right. With your selection tool, feather at 3, Cut the bottom leave then paste a bit higher than where it was, with your selection tool remove any that extends past the frame, and add drop black shadow.
*Paste Leaves 02 as a new layer, do not resize, remove bottom of stem that overlaps on the bottom, select none, add black drop shadow.
*Go to your Paper layer, add, Leaves 01, position a bit to the left, with your selection tool, remove any that extends past the frame, lower opacity to 80%. Select none, add white drop shadow.
*Duplicate Leaves 01, move to the right.
*Get your Watch selection, resize 40% move to lower left corner, with your Pick Tool selected rotate slightly left. Add white drop shadow.
* Paste Heart tag as a new layer, resize 50%, move to the upper left of the frame, NO drop shadow.
*Paste Key 02 as a new layer, resize 25%, with your Pick Tool, rotate slightly to the right, add white drop shadow.
*Go back to your tube layer, add Butterfly 04 as a new layer, resize 14% with your Pick Tool, rotate to the left, add, white drop shadow, move back to Butterfly 04, duplicate, lower opacity to 85%, resize 80%, move to another area, rotate, add white drop shadow.
*Add Butterfly 03 as a new layer, resize 14%, lower opacity to 80%, postion just behind the upper portion of the Watch, rotate right, add white drop shadow.
*Copy Butterfly 03 paste as a new layer, resize 75, rotate left, position to desired location, drop shadow white.
*Duplicate Butterfly 03, rotate, add white drop shadow.
*Duplicate Butterfly 3 resize 80%, rotate, lower opacity to 70%, add white drop shadow.
*Return to your top layer, copy Spray 01, paste as a new layer, remove all of the stem, with your Pick Tool move to the left of your tube, rotate left, lower opacity to 75% add white drop shadow.
*Return to Spray 01, duplicate, mirror, move to the right, rotate to right, add white drop shadow.
*Return to the Spray 01 layer, duplicate, mirror, resize, move to the left of the frame, resize 75%
*Go back to your tube layer, Get Leaf Scatter 01, copy and paste as a new layer, resize 75%, rotate 35% left. Create a free hand section around the Frame, invert, delete.
*Make sure everything is where you like it, then delete the bottom white layer, and merge visible.
*Resize 85%.
*Apply your copyright, url, and license number.
*Add name, using your script font, using 2 colors from your tag, add blue drop shadow.
*Save as a PNG, you are done, YAY♥
Thank you for visiting and doing this tutorial, I hope you found it enjoyable. I would love to see your results and I welcome any suggestions at CustomerService@UpYourArt.com
♥ ♥ ♥
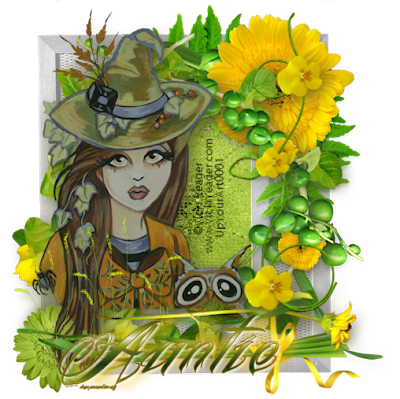
This tutorial was created by Rapsody on October 12, 2011.
Any similarity to any other tutorial is purely a coincidence.
You may share this tut but please share the only the link, thank you♥
I am using PSP 12 but any version should work!
We are using the enchanting art of the late Gretchen Raish-Baskin You must have a license to use this tube. Gretchen’s tubes can purchased at UpYourArt
This beautiful scrap kit “Angel’s Breath” is found at HeartFelt-Perfections, Thank you Leigh!
We will be using:
Butterflies
Ribbon Bow (pink)
Paper 7
Hearts
Flower String
Frame 4
Bottle
Sparkle
**After you use each element close it so you have a clean workspace.
Font: I used Passion Conflict by Rob size 125, it is a pay font but any script font will work.
Okay, let’s get started!
*Open a canvas 600 x600 flood fill white. I like to have the white so I can see my creation better as I work on it. We will delete this later.
*Copy Frame 4 and paste as a new layer, re size 30%. Add a color from your tube as drop shadow on a new layer, I used a blue, with these settings:
Offset 3, Horizontal -5, Opacity 30, Blur 50
Return to the frame layer, re-size 95% move to the top edge, do not touch or re-size the mask layer.
*Apply your tube, re-size 90% , position her so her back is resting on the frame and she is not extended off the pallet, add the blue drop shadow with the same settings.
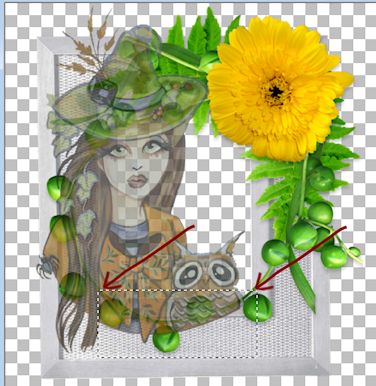
*Go to your white bottom layer and add a new layer, then go to the frame layer. Select the magic wand inside the frame and modify expand 5.
*Copy your Paper and return to your tag on the layer you just created and paste into section, select none.
*Return to the frame layer, using my tag for reference, and select some portions of the upper ribbon so it looks like it is woven though the frame, float, return to your tube layer, delete, select none. **You may want to lower the opacity of the tube to see the frame below, then raise it back to 100%**
*Copy your Pink Ribbon Bow and paste as a new layer, re-size 25%, add blue drop shadow, then lower opacity to 75%.
*Copy the Pink Bottle, paste as a new layer, re-size 35% add blue drop shadow.
*Copy the Flower String, paste as a new layer, re-size 25%, position to desired location. Then delete a bit of the string see her left arm on my tag for reference.
*Copy the Butterflies, paste as a new layer, re-size 25%, remove the handle part of this element. Now, add the blue drop shadow, changing these settings: Blur 0, Opacity and 40%. Move up to the original Butterflies element and delete.
*Copy your Sparkle paste as a new layer; re-size 28% position to the mid right.
*Go to your white layer, copy the splatter, paste as a new selection, re-size 45%. Activate your Pick tool and move the splatter to the right, duplicate, mirror, flip, with your Pick tool move down a tad.
*Stay on the top Splatter layer, copy the Hearts, paste as a new layer. Re-size, 30%, use your pick tool and move to the left so the heart is near her hand. Lower opacity to 50%.
*Make sure everything is where you like it, then delete the bottom white layer, and merge visible.
*Re-size 85%.
*Apply your copyright, url, and license number.
*Add name, using your script font, using 2 colors from your tag, add blue drop shadow.
*Save as a PNG, you are done, YAY♥
Thank you for visiting and doing this tutorial, I hope you found it enjoyable. I would love to see your results and I welcome any suggestions at CustomerService@UpYourArt.com
♥ ♥ ♥
This tutorial was created by Rapsody on October 5, 2011.
Any similarity to any other tutorial is purely a coincidence.
You may share this tut but please share the only the link, thank you♥
I am using PSP 12 but any version should work!
We are using the amazing art of Katherine Barber You must have a license to use this tube. Kat’s tubes can purchased at UpYourArt
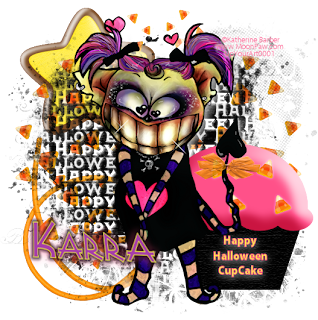
FTU Candy Cutie kit from Sekarra Designs found HERE I LOVE this kit! Thank you Sekarra!
We will be using:
Paper #5,
Rope 1, Candy Corn Scatter, Lollipop #3, Cupcake 1, Bow #3
**After you use each element close it so you have a clean workspace.
Mask 0906 from VIX You can find it HERE
2 Font of choice, I used KozukaGothic Pro H andRussel Write TT.
Okay, let’s get started!
*Open a canvas 600 x600, paste Paper #5 as a new layer merge.
*Apply VIX’s mask 0906, merge group.
*With your lasso tool set at about 10 select the upper wordage on the upper left and delete.
*Create new layer, move to bottom, under mask layer.
*Apply Rope 1 as new layer move to bottom left.
*Add Lollipop 3 as a new layer, move to upper left, delete bottom of the stick.
Apply Candy Corn Scatter as a new layer, move to right, duplicate, then mirror new layer and position to desired location.
*Add cupcake 1 as a new layer move to bottom right.
*Apply text, “Happy Halloween Cupcake” on the cupcake using a plain font apply white drop shadown at 65 opacity and blur at 15.
*Add your tube as a new layer, resize 80%, add same white drop shadow on tube.
*Add Bow 3 as a new layer. Resize 25%, using your pick took on free manipulate smaller and wider and place at the tip of the tail. Lower opacity to 80%, add white drop shadow.
*Merge visable, select all, float, crop to image, resize 85%.
*Apply your copyrights, url, and license number.
*Add your name, I like to add as a vector then move it to the correct placement and size. Add a white drop shadow and save as a png.
You are done, YAY♥
Thank you for visiting and doing this tutorial, I hope you found it enjoyable. I would love to see your results and I welcome any suggestions at CustomerService@UpYourArt.com
♥ ♥ ♥
This tutorial was created by Rapsody on October 3, 2011.
Any similarity to any other tutorial is purely a coincidence.
You may share this tut but please share the only the link, thank you♥
I am using PSP 12 but any version should work!
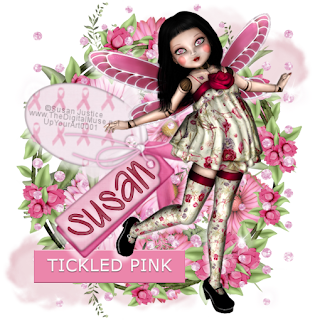
We are using the amazing art of Susan Justice You must have a license to use this tube. Susan’s tubes can purchased at UpYourArt. For a limited time this tube is FREE with purchase of $10.00!!!
FTU BCA 2009 kit from Blue Dream Designs found HERE I LOVE this kit! Thank you Bluey!
We will be using:
BD-BCA-2009 Corsage,
BCA-2009 Frame 5, BD-BCA-2009 Frame Label 1, BD-BCA-2009 Diamond Rain, BD-BCA-2009 Cloud,
**After you use each element close it so you have a clean workspace.
Font of choice, I used Cutie Pop.
Okay, let’s get started!
*Open a canvas 600 x600, flood fill white.
*Paste BD-BCA-2009 Cloud as a new layer, move to upper right, duplicate.
On new cloud layer mirror, and flip.
*Add BD-BCA-2009 Corsage as a new layer, rotate right 90%, lower opacity to 75%, move to bottom of frame, duplicate layer.
*Go to your new corsage layer and flip it.
*Add BD-BCA-2009 Frame 5 as a new layer.
*Add BD-BCA-2009 Diamond Rain as a new layer, move to the right of frame, duplicate.
*Go to the duplicated Diamond Rain frame and mirror.
*Grab your tube apply as new layer, resize 95% and mirror.
*Paste BD-BCA-2009 Label 1 as a new layer position where you want (see my tag for reference) then move down one layer.
*Return to your tube layer and add a white drop shadow.
Paste BD-BCA-2009 Tags, as a new layer, move below the tube layer.
*Mirror and active your Pick tool, scale style manipulating to where it looks correct, add white drop shadow.
Check and make sure all your elements are where you like them.
Delete your white layer, merge visible, resize 80%.
*Apply your copyrights, url, and license number.
*Add your name, I like to add as a vector then move it to the correct placement and size. Add a white drop shadow and save as a png.
You are done, YAY♥
Thank you for visiting and doing this tutorial, I hope you found it enjoyable. I would love to see your results and I welcome any suggestions at CustomerService@UpYourArt.com
♥ ♥ ♥