This tutorial was created by Rapsody on
March 18th, 2012.
Any similarity to any other tutorial is purely a coincidence.
You may share this tut but please share the only the link, thank you
♥
I am using PSP 14 but any version should work!
We are using the lovely art of
Lori Karels LK0022 Moon Witch, and LK0027 Dragon Wizard, you must have a license to use these tubes. Lori’s tubes must be purchased at
UpYourArt
This wonderful kit “Midnight Blue” by Rabid Bunny can be found HERE Thank you so much Melissa!♥
Font: Jellyka Castle's Queen, You can find it HERE.
We will be using:
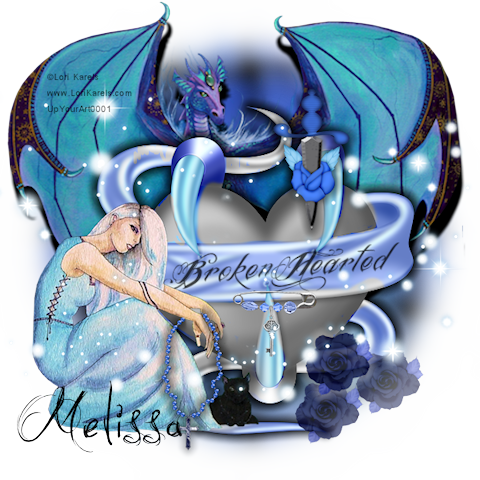
Tubes LK0022 Moon Witch @49%, and LK0027 Dragon Wizard @ 95% (cut off the tail)
Element_33 (Disco Ball)
Element_15 (Heart with Fangs)
My attached word art, Broken Hearted
Element_25 (Necklace)
Element_6 (Safety Pin with Key)
Element_45 (Dagger)
Element_10 (Dark Blue Rose)
Element_26 (Sparkles)
**After you use each element close it so you have a clean workspace.
Okay, let’s get started!
*Open a canvas 600 x600 flood fill white. I like to have this layer so I can see my creation better as I work on it. We will delete this later as well as well as resize.
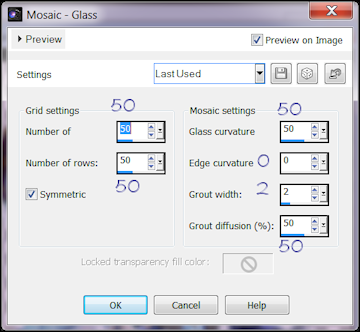
*Paste Element_33 as a new layer, go to effects, texture, Mosaic Glass with these settings:
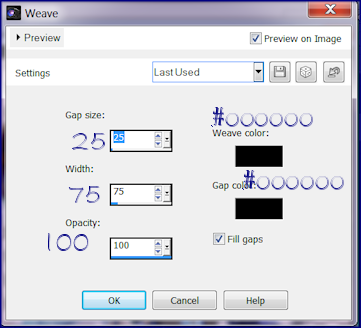
*Stay on this layer and go to effects Textures, Weave, with these settings:
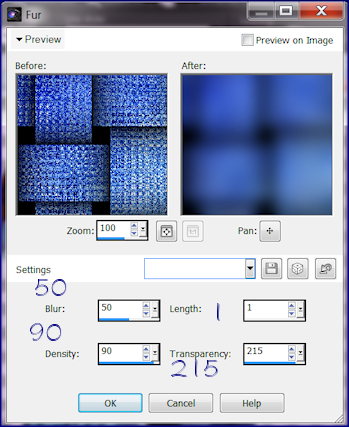
*Stay on this layer, go to effects, Textures, Fur with these settings:
 .
.
Copy LK0027 (Dragon Wizard) paste as a new layer resize 80% and move towards the top, select & remove tail. See my tag for reference, remember we can make adjustments before we merge at completion. Add a drop shadow as a new layer with these settings:
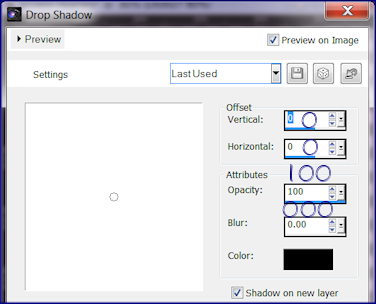
Blur with these settings:
Average, Aperture 5, move it slightly down. Return to the upper layer.
*Paste Element_15 (Heart With Fangs) as a new layer, use my tag for reference. Follow the same directions as above for drop shadow, then return to your top layer.
*I have included this overlay if you are not comfortable using the change to target tool. I would encourage you to try it before using mine. How I did it was I put the target color to #00000 and carefully colored the heart portion of the element, it’s really easy but does take about 10 mins to do so. If you do it on your own simply select my words and put on the desired location.

Thank you so much Melissa for allowing me to provide this♥
*Paste LK0022 Moon Witch as a new layer, resize 49% and move to the lower left.
Paste Element_25 (Necklace) as a new layer, resize 35% position so she appears to be holding it, select and delete a bit near the upper hand, select none add the same drop shadow as above and blur do not move.
*Paste Element_6 (Safety Pin with Key) resize 25% and position over the drop, use my tag for reference.
*Add Element_45 (Dagger) as a new layer, resize 40% and move to the upper left of the ribbon, add drop shadow same as above.
*Paste Element_10 (Dark Blue Rose) as a new layer, resize 20% move to the bottom right, lower opacity to 78. Duplicate 2 times and position like my tag.
*Paste Element_26 (Sparkles) as a new layer, move down just a tad, if you desire, use your selection tool to remove the sparkles from her face.
*Make sure everything is where you like it, check for anything stray and remove them, then delete the bottom white layer, merge visible, resize 80%.
*Apply your copyright, URL, and your UpYourArt license number.
*Add names, using Jellyka Castles Queen in black.
*Save as a PNG, you are done, YAY♥
Thank you for visiting and doing this tutorial, I hope you found it enjoyable. I would love to see your results and I welcome any questions or suggestions please Email Me
Raps
♥ ♥ ♥



No comments:
Post a Comment