Friday, March 2, 2012

I Curse Thee


This tutorial was created by Rapsody on March 3, 2012.
Any similarity to any other tutorial is purely a coincidence.
I have not used plugins or drop shadows but recommend you use them where you see fit.  This tut also screams animation!
You may share this tut but please share the only the link, thank you♥
I am using PSP 12 but any version should work!

We are using the enchanting art of  Dawn Obrecht DO0028, you must have a license to use this tube. Dawn’s tubes must be purchased at UpYourArt
This wonderful kit “Bruised” by Horse Play Pastures can be found HERE Thank you so much Bevieeeeeeee!♥
Font French Script @ 70.

We will be using:
Tube DO0028 I Curse Thee
hpd_HerDiary-Paper 10
hpd_ HerDiary_66 80%
hpd_ Diary_35 Resize 90%
hpd_ HerDiary_59 resize 90%
hpd_ HerDiary_46 40%
hpd_ HerDiary_57 35% opacity 50%
hpd_ HerDiary_35 Roate 90% left, resize 40%
hpd_ HerDiary_50@ 40%
hpd_ HerDiary_58 @ 30%
hpd_ HerDiary_41 @ 22%
hpd_ HerDiary_21 75% mirror
hpd_ HerDiary_18 15% rotate left 20, mirror
**After you use each element close it so you have a clean workspace.

Okay, let’s get started!

*Open a canvas 600 x600 flood fill white. I like to have this layer so I can see my creation better as I work on it.  We will delete this later as well as resize.
*Paste hpd_HerDiary-Paper 10 as a new layer, mirror.
*Paste hpd_ HerDiary_66 as a new layer resize 80%. Move the frame so the 2 smaller butterflies are visible.  Click inside the frame, as well as the smaller openings, invert, go to paper layer and delete.
*Return the frame layer, paste Diary_35 resize 90% lower opacity to 70%.  Duplicate, mirror and raised opacity to 100%.
*Paste hpd_HerDiary_59 as a new layer, resize 90%.
*Paste Tube as a new layer, position on the lower left of frame.
*Drop down one layer, paste hpd_ HerDiary_46, resize 40%, position on the lower right.
*Go down one layer (under the diary), copy from your tube elements layer and carefully select the yellow flower, paste as a new layer on the bottom right. Duplicate layer, mirror, and
position using my tag for reference.
*Paste hpd_ HerDiary_57  as a new layer, resize 35%, lower opacity to 50%.
*Paste hpd_ HerDiary_35   as a new layer, rotate 90% left, resize 40% position on the lower left.
*Copy hpd_HerDiary_50 paste as a new layer, resize 40% move near her foot.
*Go up to your tube layer.  From your tube element layer, carefully select the purple flowers, paste as a new layer, position so they look to be in her hand.
*Paste hpd_HerDiary_58 as a new layer, resize 30% .  Select the lower portion of the bottle float and flood fill it with a color from your tag.  I used a purple, add noise, and select none.
*Paste hpd_HerDiary_41 as a new layer, resize 22%.
*Paste
hpd_ HerDiary_21  as a new layer, resize 75% and mirror, place on the upper right.
* Get the dagger from your element layers and paste as a new layer, mirror rotate right 45 and position on the bottom see my tag for reference.
*Paste hpd_ HerDiary_18 resize 15%, then rotate left 20 and mirror. Use my tag for reference for placement.

*Make sure everything is where you like it, check for anything stray and remove them, then delete the bottom white layer, merge visible, resize 80%.
*Apply your copyright, url, and license number.
*Add names, using
French Script, using 2 colors from your tag,  I used a purple and green from the tag then added a gradient glow of green.
*Save as a PNG, you are done, YAY
♥
Thank you for visiting and doing this tutorial, I hope you found it enjoyable. I would love to see your results and I welcome any suggestions at CustomerService@UpYourArt.com
Raps
♥ ♥ ♥

Wednesday, February 29, 2012

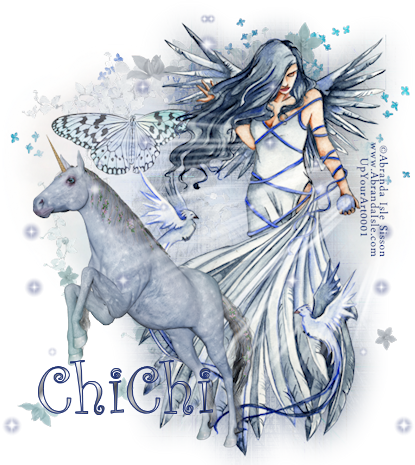
Fairy Tale

This tutorial was created by Rapsody on February 29th, 2012.
Any similarity to any other tutorial is purely a coincidence.
You may share this tut but please share the only the link, thank you
♥
I am using PSP 12 but any version should work!

We are using the lovely art of
Abranda Icle AI0014, you must have a license to use this tube. Abranda’s tubes must be purchased at UpYourArt
This FTU enchanting scrap kit “Fairy Tale” by ChiChi Designz can be found HERE Thank you so much Cindy!♥
Font Curlz MT @ 90 pt. Outline #223474, any silver gradient.

We will be using:
Tube AI0014 Blue Moon
Heart_CD_FairyTalesSampler
Flowers_CD_FairyTalesSampler
Branches_CD_FairyTalesSampler
Butterfly_CD_FairyTalesSampler
Sunray_CD_FairyTalesSampler
Unicorn_CD_FairyTalesSampler
Sparkle_CD_FairyTalesSampler
**After you use each element close it so you have a clean workspace.

Okay, let’s get started!

*Open a canvas 600 x600 flood fill black. I like to have this layer so I can see my creation better as I work on it.  We will delete this later as well as resize.
*Paste Heart
_CD_FairyTalesSampler as a new layer.
*Paste
Branches_CD_FairyTalesSampler as a new layer, move up on the heart (use my tag as a reference, then move down one layer.
*Return to the heart layer and paste Flowers_CD_FairyTalesSampler as a new layer, resize 90%.
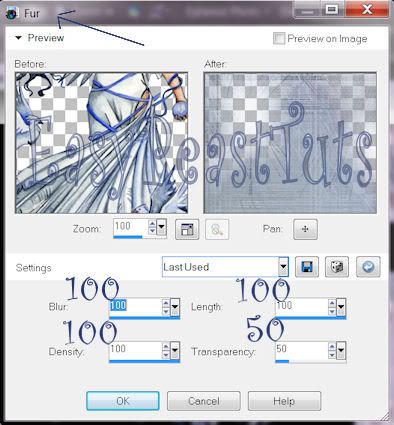
*Paste your tube as a new layer, resize 90% move to the right, duplicate, on the bottom tube layer, do Texure effect, Fur with these settings:
100, 100, 100, 50
Photobucket
*Paste
Unicorn_CD_FairyTalesSampler as a new layer, resize 70% move to the bottom left.
*Paste
Butterfly_CD_FairyTalesSampler as a new layer, resize 30% move to the left of tube’s hair, lower opacity to 65%.
*Go to your top layer, add Sunray_CD
_FairyTalesSampler as a new layer, resize 90%, set your feather tool to 10 and remove the bottom quarter of the ray, see tag for reference.
*Add Sparkle_CD_FairyTalesSampler as a new layer, resize 90% move to the right, duplicate.  Mirror and position like my tag.
*Make sure everything is where you like it, check for anything stray and remove them, then delete the bottom black layer, merge visible, select all, float, crop to selection, resize 80%.
*Apply your copyright, url, and license number.
*Add names, using
Curlz MT, using 2 colors from your tag,  I used #223474 and a silver gradient with a white gradient glow.
*Save as a PNG, you are done, YAY
♥
Thank you for visiting and doing this tutorial, I hope you found it enjoyable. I would love to see your results and I welcome any suggestions at CustomerService@UpYourArt.com
Raps
♥ ♥ ♥

Wednesday, February 22, 2012

Good Day Indeed

d

This tutorial was created by Rapsody on
February 22th, 2012.
Any similarity to any other tutorial is purely a coincidence.
You may share this tut but please share the only the link, thank you
♥
I am using PSP 12 but any version should work!

We are using the lovely art of
Carrie Hall CH0002, you must have a license to use this tube. Carrie’s tubes must be purchased at UpYourArt
This versatile scrap kit “Good Day For Ducks” by Horse Play Pastures can be found HERE Thank you so much Bevie!♥
Font Lover’s Quarrel by Rob which is a ptu font if you don’t own it any scripty font will do @ 120 pt.

We will be using:
Tube CH0002 Autumn’s Dust
hpd_GDFD_26 60% (frame)
hpd_GDFD_Paper1
 hpd_GDFD_60 @75%
Sun Flower Garland hpd_GDFD_32 @ 50%  rotate 90
Swing hpd_GDFD_41 50%
Grass hpd_GDFD_59 @75%
Multi color flowers hpd_GDFD_43 @20%
Flower hpd_GDFD_42 20%
Ducks hpd_GDFD_4 20%
Yellow bow hpd_GDFD_7 resize 40% rotate 30 left
**After you use each element close it so you have a clean workspace.

Okay, let’s get started!

*Open a canvas 600 x600 flood fill white. I like to have the white so I can see my creation better as I work on it.  We will delete this later as well as resize.
*Get
hpd_GDFD_26 (frame) paste as a new layer. Resize 60%m and move up.
*With your selection tool touch the inside of the frame, create a new layer and paste hpd_GDFD_Paper1 into selection.  Select none, move down (below the frame) duplicate.
*Go to the bottom paper layer, resize 120% then add Texture effect fur with these settings::
Blur 100, Length 100, Density 100, Transparency 50.
*Return to the upper paper layer, add hpd_GDFD_60   resize 75%.
*Go to the frame layer (top layer) and add hpd_GDFD_32 (Sun Flower Garland) rotate 90% left, resize 50%.  Position to desired location, use my tag as a reference.  Duplicate, mirror and position so it is not even with the other side.
*Get your Carrie Hall tube CH0002 and paste as new layer, see my tag for positioning.
*Go to layer below your tube, and paste hpd_GDFD_41 (swing) as a new layer, resize 50%, position like my tag, remove any extra chain on the top.
*Copy hpd_GDFD_59 (grass), paste as a new layer, resize 75% and mirror.  With your selection tool, select the left side only, cut, then paste closer to the other side. Select none, duplicate. Go to the original layer below and do the same texture effect as above, (Blur 100, Length 100, Density 100, Transparency 50.) if any of the tube layer’s foot is peeking through on the bottom remove it.
*Return to the upper grass layer, past hpd_GDFD_43 (multi-color flowers) resize 20%, using my tag as a reference copy and paste into selection (same layer) as many times as you desire please use my tag for reference.  If any over hangs, select and delete.
*Copy and paste
hpd_GDFD_42 (white flower) as a new layer, resize 20%, copy and paste as a new selection about 6 times remove any stems that overlap.
*Go to your tube layer, paste
hpd_GDFD_4 (ducks) as a new layer, resize 20%.  Duplicate, position to the left of your first duck.  Duplicate bring this layer above the grass, see my tag for reference, lower opacity to 80%.
Paste
hpd_GDFD_7 (yellow bow)resize 40% rotate 30 left, see my tag for reference.
 
*Make sure everything is where you like it, check for anything stray and remove them, then delete the bottom white layer, merge visible, select all, float, crop to selection.

*Apply your copyright, url, and license number.
*Add names, using
Rob’s Lover’s Quarrel, using 2 colors from your tag,  I added very slight yellow gradient glow.
*Save as a PNG, you are done, YAY
♥
Thank you for visiting and doing this tutorial, I hope you found it enjoyable. I would love to see your results and I welcome any suggestions at CustomerService@UpYourArt.com
Raps ♥
♥ ♥ ♥

Sunday, February 19, 2012

Ariadne

This tutorial was created by Rapsody on February 19th, 2012.
Any similarity to any other tutorial is purely a coincidence.
You may share this tut but please share the only the link, thank you
♥
I am using PSP 12 but any version should work!

We are using the lovely art of
Michele Lynch ML0002, you must have a license to use this tube. Michele’s tubes must be purchased at UpYourArt
This lovely FTU scrap kit “Vicky” by Jessica can be found HERE Thank you so much Jessica, so many goodies!♥
Font FTU Hawaii Killer 150 by HERE

We will be using:
Tube ML0002 Ariadne
V_Frame2 resized 458 x 471 (uncheck Keep Aspect Ratio)
V_TS paper3
V_net5   @ 55%
V_waves1 @ 50% flipped, opacity 80%
V_flowers1 @ 25%
V_Bow6 @ 50%
V_Shell 1 @ 35%
V_shell2 @30% rotate 70 left
V_shell3 @ 25%

**After you use each element close it so you have a clean workspace.

Okay, let’s get started!

*Open a canvas 600 x600 flood fill white. I like to have the white so I can see my creation better as I work on it.  We will delete this later as well as resize.
*Get
V_Frame2 and paste as a new layer. Resize to 458 x 471 (uncheck Keep Aspect Ratio) Move up slightly.
*Copy V_TS paper3, Go to your white layer and paste as a new layer.  Position so the  pattern you like shows through.  Make a square selection that extends outside of the frame opening, invert, delete, select none.
*Return to the frame layer with V_net5  resize to 55% and position to the left so a bit over hangs the outer portion of the frame.
*Copy your tube, paste as a new layer resize 90%, position so the cut-off portion of the tail is flush with the top of the frame.
*Paste V_Waves1 as a new layer,  resize to 50%, flip, bring to the bottom of the frame, position so the dip frames the face, I also used the tool set on free and stretched it a tad to the left to have the desired fit, you will have to play with this setting, please see my tag for reference.  With your square selection tool, select the desired portion so all is flush with the frame except on the bottom where you need it to extend, invert, delete, select none, lower opacity to 80.
*Go back to the tube layer, paste V_flowers1 as a new layer and resize 25% position on the bottom left of the frame.
*Paste V_Bow6  as a new layer, resize 50%, and position on the upper right of the frame so it looks that the string part of the “fish” is attached.
*Paste V_Shell1 as a new layer, resize 35%, position on the lower left of the frame.
*Add V_shell2 as a new layer, resize 30%, rotate Left 70, position above the other shell covering the hair on the right side.
*Paste V_shell3 as a new layer resize 25%, position to the left of the other shells a bit lower.
*Return to your white layer, copy from your tube the layer, bonus (b) paste as a new layer. 
*Make sure everything is where you like it, check for any stray pixels and remove them, then delete the bottom white layer, merge visible, select all, float, crop to selection, and resize to 90%. 

*Apply your copyright, url, and license number.
*Add names, using
Hawaii Killer, using #d1dfac  and #577679, I added very slight black drop shadow.
*Save as a PNG, you are done, YAY
♥
Thank you for visiting and doing this tutorial, I hope you found it enjoyable. I would love to see your results and I welcome any suggestions at CustomerService@UpYourArt.com
Raps ♥
♥ ♥ ♥

Tuesday, February 7, 2012

Pretty In Pink

This tutorial was created by Rapsody on February 7th, 2012.
Any similarity to any other tutorial is purely a coincidence.
You may share this tut but please share the only the link, thank you
♥
I am using PSP 12 but any version should work!

We are using the stunning art of  Nicholas Garton- GartArt, you must have a license to use this tube. Nick’s tubes must be purchased at
UpYourArt
This lovely scrap kit TEMPTED by Leigh can be found at Heartfelt Perfections.  Thank you so much Leigh!♥
Font P22 Imperial can be found
HERE

We will be using:
Tube NG0006
Word Art provided by me.
Photobucket
frame 2 @ 23%
paper9
box
scatter Hearts 15%
scroll 2 15%
floral deco 10%

**After you use each element close it so you have a clean workspace.

Okay, let’s get started!

*Open a canvas 600 x600 flood fill white. I like to have the white so I can see my creation better as I work on it.  We will delete this later as well as resize.
*Copy your
frame 2 and paste as a new layer, resize 23%.
*With your selection tool, activate the inner part of the frame, modify > expand 3, create new layer, paste
p9 into selection, select none, move down one layer under the frame.
*Using your “Change to Target” tool change the color of the paper to #fe10b7
Photobucket
*Copy
box and paste as a new layer, resize 10% move to lower right of the frame, please see my tag for reference.
*Paste your tube as a new layer, select the left portion including her face, hair and hand, float, go to the frame layer hit delete, select none.
Photobucket
*Go to the pink paper layer, paste scattered hearts as a new layer, resize 15% position to desired location, copy and paste into selection where desired using my tag for reference, I did it more than 3 times.
*Go to your bottom white layer and add
beads as a new layer, resize 15%, position on the upper left, copy, paste beads as a new selection on same layer put on the lower left, select none.
*Return to the white layer, paste
scroll 2 as a new layer, resize 15% position on the lower left of frame please see my tag as a reference.
*Go to your top layer, copy floral deco paste as a new layer, resize 10% position it on the pink flower on the lower right.
*Paste the enclosed word art as a new layer on the right side of the frame.
*If you would like to do your copyright, url, and license number like I did here’s what you need to do.
*Make a round shape vector the same size as the pink paper.  Move it away to the left slightly.  Create a new layer, then activate your font, when it shows the “circle” type your © information, put spaces as needed to get it where you want it, convert to raster layer.  Create a new layer, and repeat steps above for the url, repeat again for your license number.  
**If you don’t do your credits on the vector then add more hearts to fill the space.

 *Make sure everything is where you like it, check for any stray pixels and remove them, then delete the bottom white layer, and merge visible, select all, float, crop to selection, and resize to 80%. 

*Add names, using your P22 Imperial, using pink we used for the target color and black.
*Save as a PNG, you are done, YAY
♥
Thank you for visiting and doing this tutorial, I hope you found it enjoyable. I would love to see your results and I welcome any suggestions at CustomerService@UpYourArt.com
Raps
♥ ♥ ♥

Tuesday, January 17, 2012

Harmony

This tutorial was created by Rapsody on January 17, 2012.
Any similarity to any other tutorial is purely a coincidence.
You may share this tut but please share the only the link, thank you
♥
I am using PSP 12 but any version should work!

We are using the amazing art of Alena Lazareva you must have a license to use this tube.   This tube has tons of multi use layers!Alena’s tubes can purchased at
UpYourArt
This fab FTU scrap kit by Becky can be found HERE Thank you Becky♥
This gorgeous mask can be found Moon Beams and Spider Webs Thanks so much Staci
♥
We will be using:
leafys rotate right 40%
triple frame rotate left 90%
pendant
bow 2 resize 80%
butterfly Yellow 65%
daisy swag rotate right 90%
daisy
purple flower
**After you use each element close it so you have a clean workspace.
Font: I used Inspiration by Rob, a pay font, (size 100) but any pretty script font will work.
Okay, let’s get started!
*Open a new image 377 x 478 flood fill green (#004000) Add Staci’s mask as a new mask layer, merge group, leave this for now as we will get it in a minute.
*Open a canvas 600 x600 flood fill white. I like to have the white so I can see my creation better as I work on it.  We will delete this later as well as resize.
*Copy your mask image and paste as a new layer.
*Copy Leafy, paste as a new layer, rotate right 40%, move to the outer right edge of the mask.
Copy and paste triple frame as a new layer, rotate left 90%.
*Go back to leafys layer.
*Copy and paste the flower basket as a new layer to the bottom right of the frame so it is underneath the frame.
*Return to the top layer then copy pendant, paste as a new layer, position on the upper right of the frame.
*Copy bow2, paste as a new layer, resize, 80% place above the pendant.
*Copy daisy swag, paste as a new layer rotate right 90%. Place to the left above the frame.
*Place tube as a new layer, resize 80% then mirror and position to the slight left center of the frame.
*Add drop shadow with these settings::
3 2 80 10 on a new layer.
Go to the shadow layer, do a Gaussian blur at 5.
*return to your top layer, copy butterfly Yellow, paste as a new layer, resize 65% and place just above her hand.
*Grab your daisy and purple flowers and arrange as a new layers as shown on tag.

*Make sure everything is where you like it, then delete the bottom white layer, and merge visible, select all, float, crop to selection. 

*Apply your copyright, url, and license number.
*Add names, using your Inspiration, using yellow from your tube and a purple gradient, use the drop shadow from above, lowering the shadow opacity to 80%.
*Save as a PNG, you are done, YAY
♥
Thank you for visiting and doing this tutorial, I hope you found it enjoyable. I would love to see your results and I welcome any suggestions at CustomerService@UpYourArt.com
Raps ♥
♥ ♥ ♥

Friday, December 2, 2011

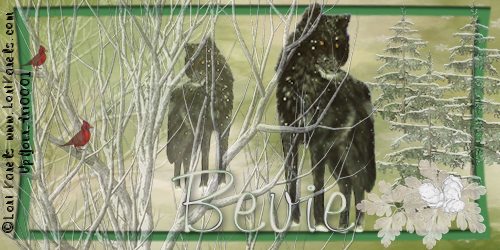
Twilite Forum Set


This tutorial was created by Rapsody on December 3, 2011.
Any similarity to any other tutorial is purely a coincidence.
You may share this tut but please share the only the link, thank you
♥
I am using PSP 12 but any version should work!

We are using the amazing art of Lori Karels  you must have a license to use this tube. Lori’s tubes can only be purchased at
UpYourArt
This fab scrap kit Christmas In My Heart by HorsePlaysPastures can be purchased at  ScrapsF rom The Heart   Thank you Bevi♥
We will be using:
HPD_CIMH Paper 8

HPD_CIMH_39 re-size 83%
HPD_ CIMH resize 30%, 70% opacity 60
Copy HPD_ CIMH_17 re-size 30% & 70%
HPD_CIMH_30 re-size 8% and 80%
Copy HPD_CIMH_18 opacity @50%

HPD_CIMH_31 20%
HPD_CIMH_30 @20% then 80%
**After you use each element close it so you have a clean workspace.
Font of choice, I used Kaleigh (size 90) with a dove gray and green gradient; but any pretty script font will work.
Okay, let’s get started!

*Open a new image 500 x 250 flood fill white.
*Paste
HPD_CIMH Paper 8 as a new layer, position so the trees show on the left, please use my tag as a reference.
*Copy and paste HPD_CIMH_39
as new layer, re-size 83%.
*Copy HPD_ CIMH_17 paste as a new layer. Re-size 30%, position to the right of the frame resize 30%, copy and paste into selection move a bit over, paste again as a new selection, resize 70% and move between the 2 trees, select none, lower opacity to 60
%.
*Add tube, re-size 40%, and duplicate layer, go to the new tube layer (top layer), mirror, resize 80% and lower opacity to 70%.
*Copy HPD_CIMH_18
and paste as a new layer, position on the left, please use my tag as a reference, lower opacity to 50%.
*Copy HPD_CIMH_30
and paste as a new layer, resize 8%, copy and paste as a new selection, resize 80% positioning to desired location, select none, lower opacity to 70%.
Copy HPD_CIMH_31, paste as a new layer, re-size to 20%, copy and paste into selection near the first one, select none, lower opacity to 80%.
*Copy HPD_CIMH_25
paste as a new layer, re-size 16% move over the previous layer, use my tag as a reference. Copy and paste as a new selection position to the left of the first, select none.
*Make sure everything is where you like it, then copy merged and paste as a new layer. 
*Apply your copyright, url, and license number.
*Add names, using Kaileigh, using soft gray and green gradient. Drop shadow optional.
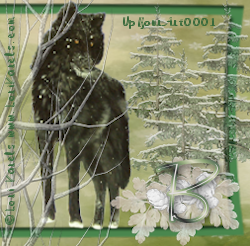
*To do the avatar, select an area you like with 0 on your square selection tool.  Copy merged, paste as a new layer.  Add your url, and copyright plus desired intial.
*Save as a PNG, you are done, YAY♥
Thank you for visiting and doing this tutorial, I hope you found it enjoyable. I would love to see your results and I welcome any suggestions at CustomerService@UpYourArt.com
Raps ♥
♥ ♥ ♥