

This tutorial was created by Rapsody on October 16, 2011.
Any similarity to any other tutorial is purely a coincidence.
You may share this tut but please share the only the link, thank you♥
I am using PSP 12 but any version should work!
We are using the whimsical art of Vicki Yeager You must have a license to use this tube. Vicki’s tubes can purchased at UpYourArt
This beautiful scrap kit “Spring Serenade” by Leigh Penrod may be purchased at HeartFelt-Perfections
We will be using:
HP-ssf3
HP-sse19
Hp-ssf14
HP-ssf 12
HP-sse4
**After you use each element close it so you have a clean workspace.
Font: I used Ink In The Meat at 150 with a gradient and a forrest green.
Okay, let’s get started!
*Open a canvas 600 x600 flood fill white. I like to have the white so I can see my creation better as I work on it. We will delete this later.
Copy and paste HP-ssf3 as a new layer, resize 34%, and move up to the upper edge.
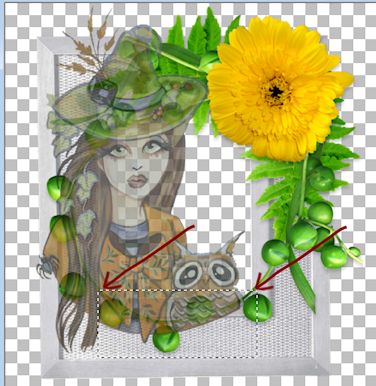
*Apply your tube, resize 90% and move slightly to the left. With your Rectangle Selection tool set at 0, delete part of the tube to her hair, see my example:
Select none. Add drop shadow with the following settings:
Offset 7, Horizontal 8, Opacity 75, Blur 40, Color #505125
*With your Magic Wand (tolerance at 4) click in the center of the frame, return to the white layer and add new layer. Copy HP-sse19 and paste into selection into the new layer, select none.
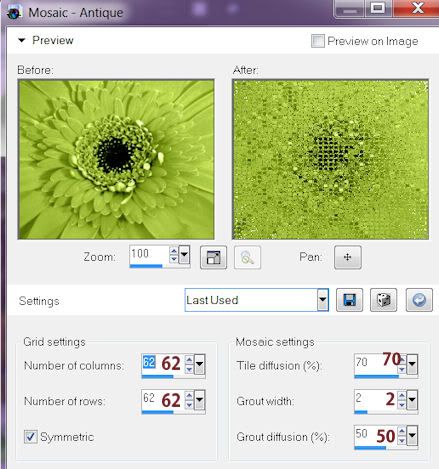
*Stay on the current layer, add effect Mosaic with these settings:
*Add HP-sse19 as a new layer, resize 7% , with your Pick Tool move to the lower left of the frame so 1/3 is showing off the frame.
*Return to your frame layer and paste HP-sse19 as a new layer, resize 7%, move to the lower left of the frame. Add drop shadow.
*Return to your frame layer and paste HP-ssF4 as a new layer, resize 26%, move slightly to the left overlapping the outer edge of the frame, add drop shadow.
* Return to your tube layer, add HP-sse14 as a new layer, resize 21% move to lower part of frame below the opening, add drop shadow.
*Paste HP-ssf 12 as a new layer, resize 22%, rotate 90% left, move to the right of the frame, add drop shadow.
*Return to your top layer, paste HP-sse4 as a new layer, resize 13% move to lower left of frame, duplicate, mirror, move slightly to the left. Add your drop shadow on both layers.
*Make sure everything is where you like it, then delete the bottom white layer, and merge visible.
*Resize 85%, remove any extra space by selecting all, float, crop to selection.
*Apply your copyright, URL, and license number.
*Add name, using your script font, using 2 colors from your tag, add drop shadow.
*Save as a PNG, you are done, YAY♥
Thank you for visiting and doing this tutorial, I hope you found it enjoyable. I would love to see your results and I welcome any suggestions at CustomerService@UpYourArt.com
♥ ♥ ♥
Any similarity to any other tutorial is purely a coincidence.
You may share this tut but please share the only the link, thank you♥
I am using PSP 12 but any version should work!
We are using the whimsical art of Vicki Yeager You must have a license to use this tube. Vicki’s tubes can purchased at UpYourArt
This beautiful scrap kit “Spring Serenade” by Leigh Penrod may be purchased at HeartFelt-Perfections
We will be using:
HP-ssf3
HP-sse19
Hp-ssf14
HP-ssf 12
HP-sse4
**After you use each element close it so you have a clean workspace.
Font: I used Ink In The Meat at 150 with a gradient and a forrest green.
Okay, let’s get started!
*Open a canvas 600 x600 flood fill white. I like to have the white so I can see my creation better as I work on it. We will delete this later.
Copy and paste HP-ssf3 as a new layer, resize 34%, and move up to the upper edge.
*Apply your tube, resize 90% and move slightly to the left. With your Rectangle Selection tool set at 0, delete part of the tube to her hair, see my example:

Select none. Add drop shadow with the following settings:
Offset 7, Horizontal 8, Opacity 75, Blur 40, Color #505125
*With your Magic Wand (tolerance at 4) click in the center of the frame, return to the white layer and add new layer. Copy HP-sse19 and paste into selection into the new layer, select none.
*Stay on the current layer, add effect Mosaic with these settings:
*Add HP-sse19 as a new layer, resize 7% , with your Pick Tool move to the lower left of the frame so 1/3 is showing off the frame.
*Return to your frame layer and paste HP-sse19 as a new layer, resize 7%, move to the lower left of the frame. Add drop shadow.
*Return to your frame layer and paste HP-ssF4 as a new layer, resize 26%, move slightly to the left overlapping the outer edge of the frame, add drop shadow.
* Return to your tube layer, add HP-sse14 as a new layer, resize 21% move to lower part of frame below the opening, add drop shadow.
*Paste HP-ssf 12 as a new layer, resize 22%, rotate 90% left, move to the right of the frame, add drop shadow.
*Return to your top layer, paste HP-sse4 as a new layer, resize 13% move to lower left of frame, duplicate, mirror, move slightly to the left. Add your drop shadow on both layers.
*Make sure everything is where you like it, then delete the bottom white layer, and merge visible.
*Resize 85%, remove any extra space by selecting all, float, crop to selection.
*Apply your copyright, URL, and license number.
*Add name, using your script font, using 2 colors from your tag, add drop shadow.
*Save as a PNG, you are done, YAY♥
Thank you for visiting and doing this tutorial, I hope you found it enjoyable. I would love to see your results and I welcome any suggestions at CustomerService@UpYourArt.com
♥ ♥ ♥
Your work is very beautiful. I am amaze at all of the art and technics. I am just a beginner and I wish I had the knake to do the same as you and the others. This is why I am visiting your site . When I complete a piece I shall let you know. Thanks
ReplyDelete